Desert Online General Trading LLC
Dubai, United Arab Emirates
Desert Online General Trading LLC
Dubai, United Arab Emirates


🌐 Own your workstation from anywhere — the future of remote control is here!
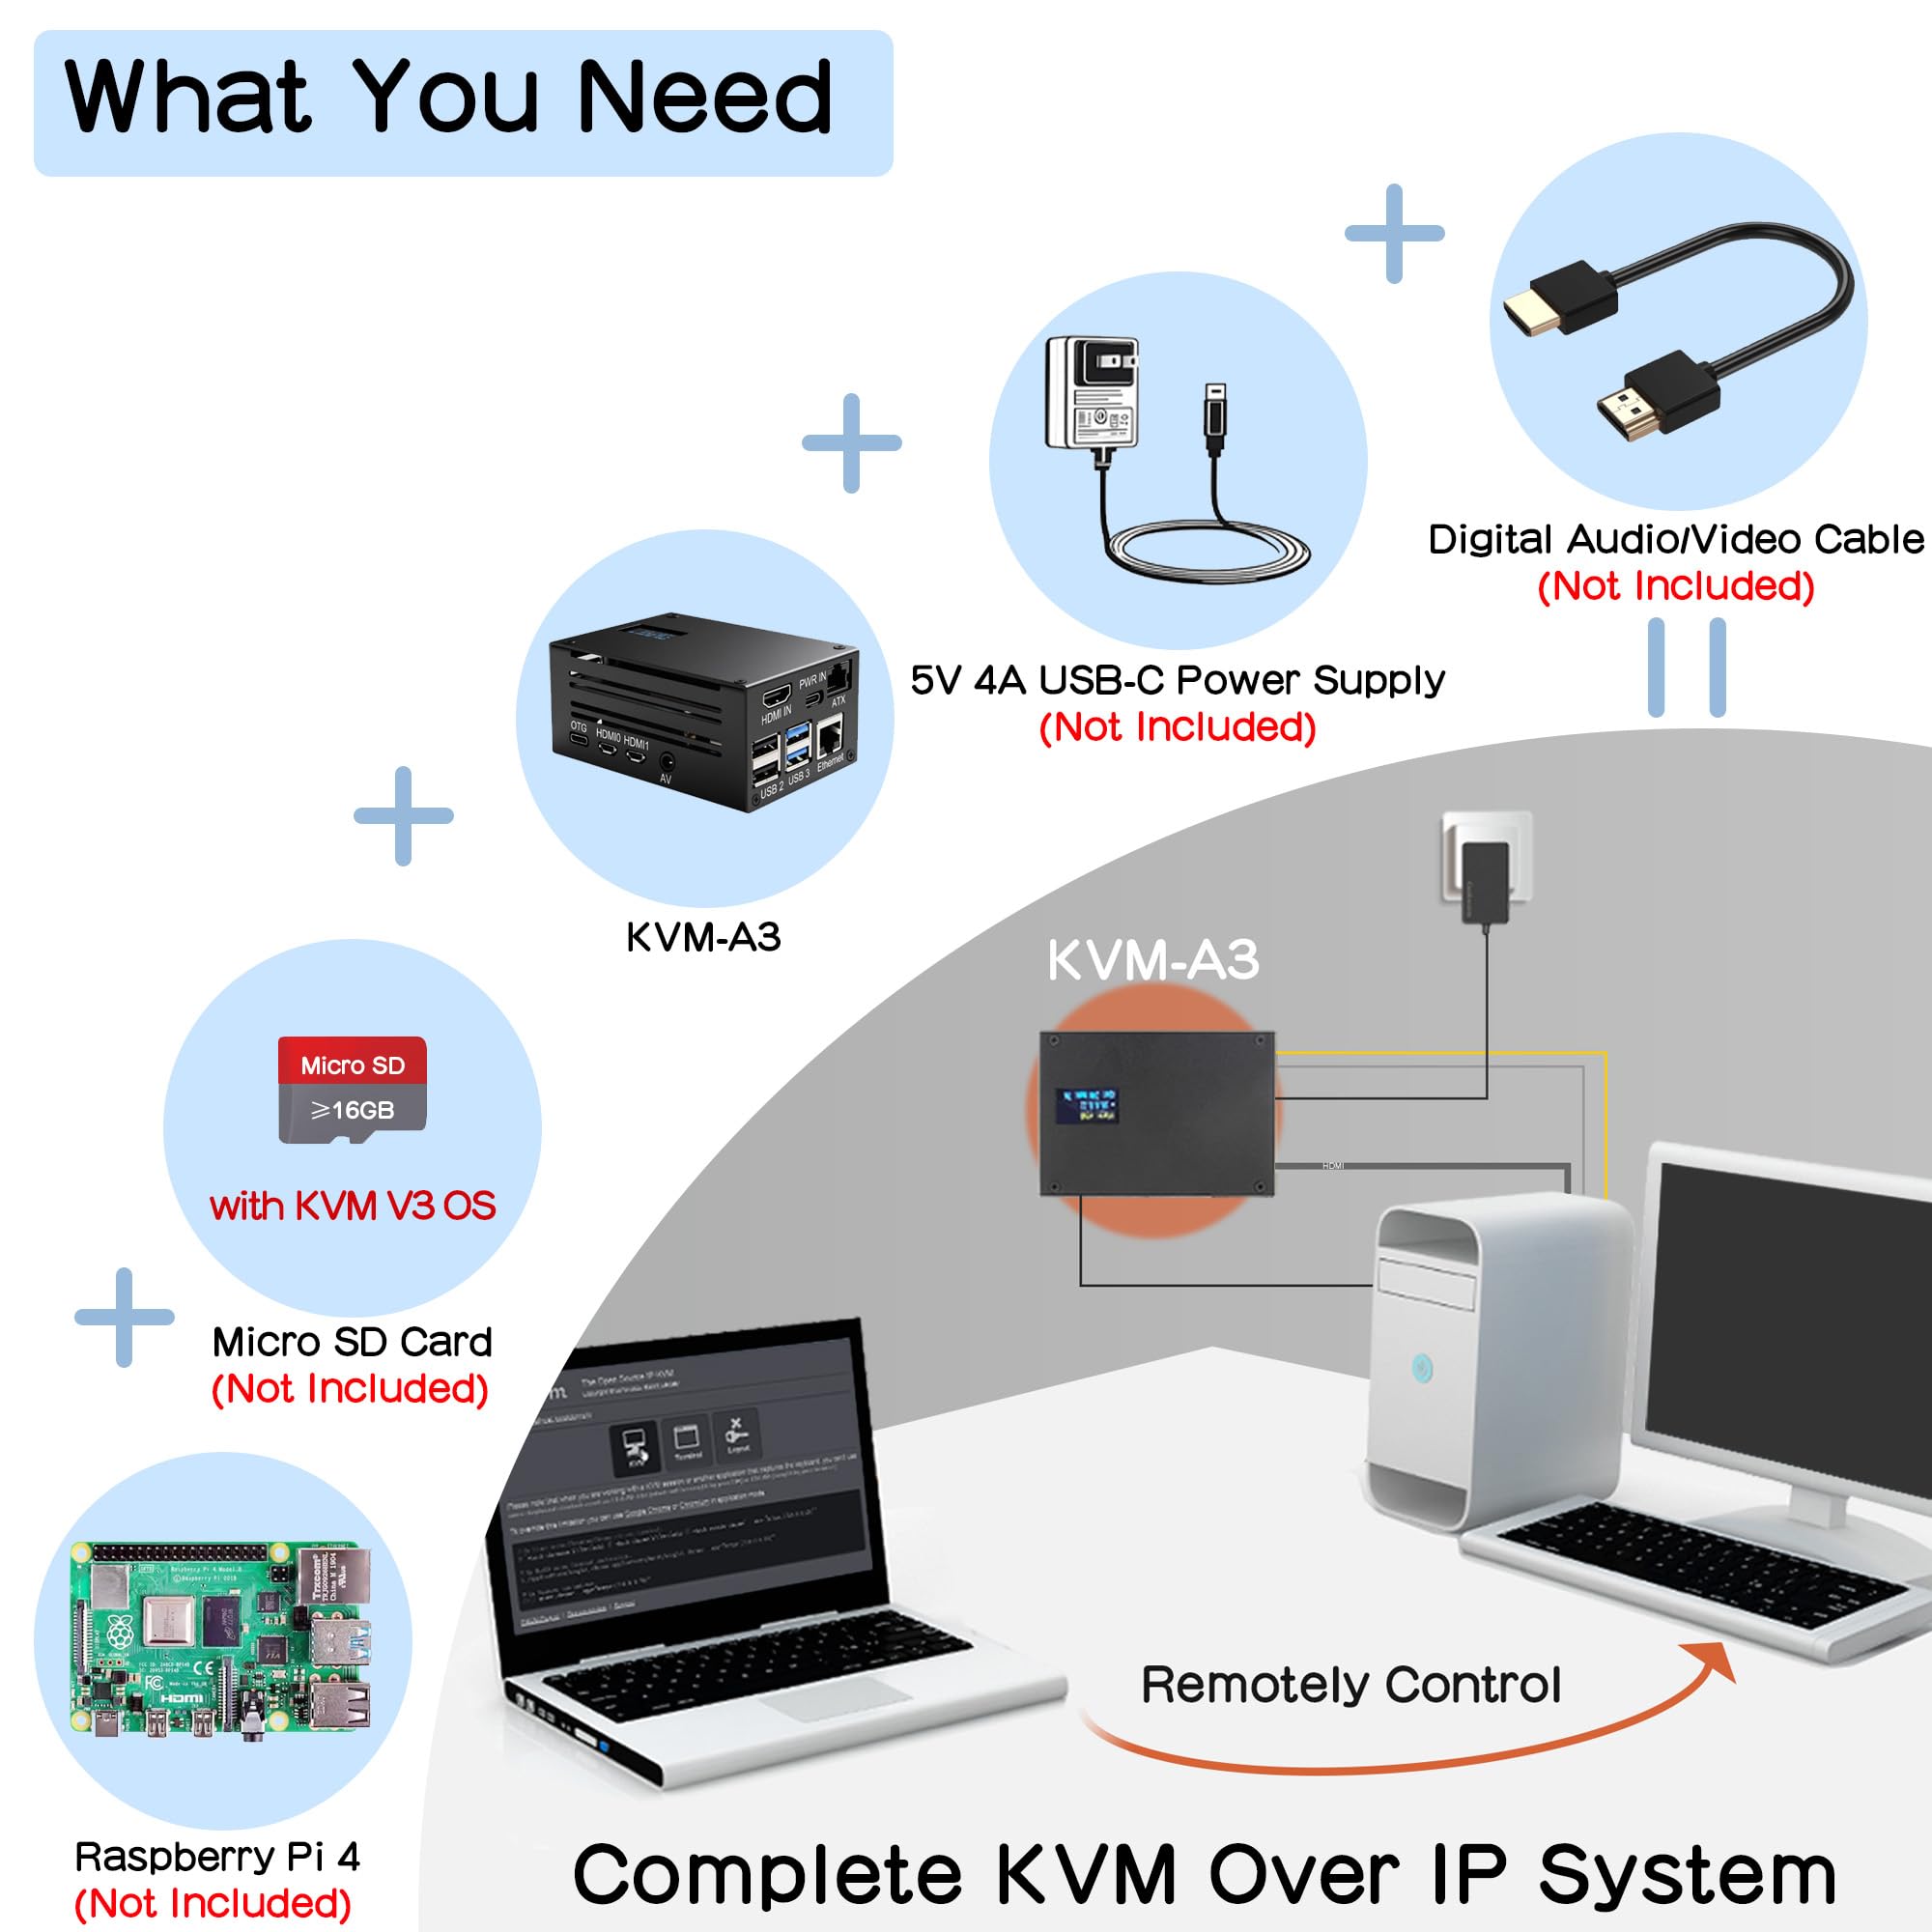
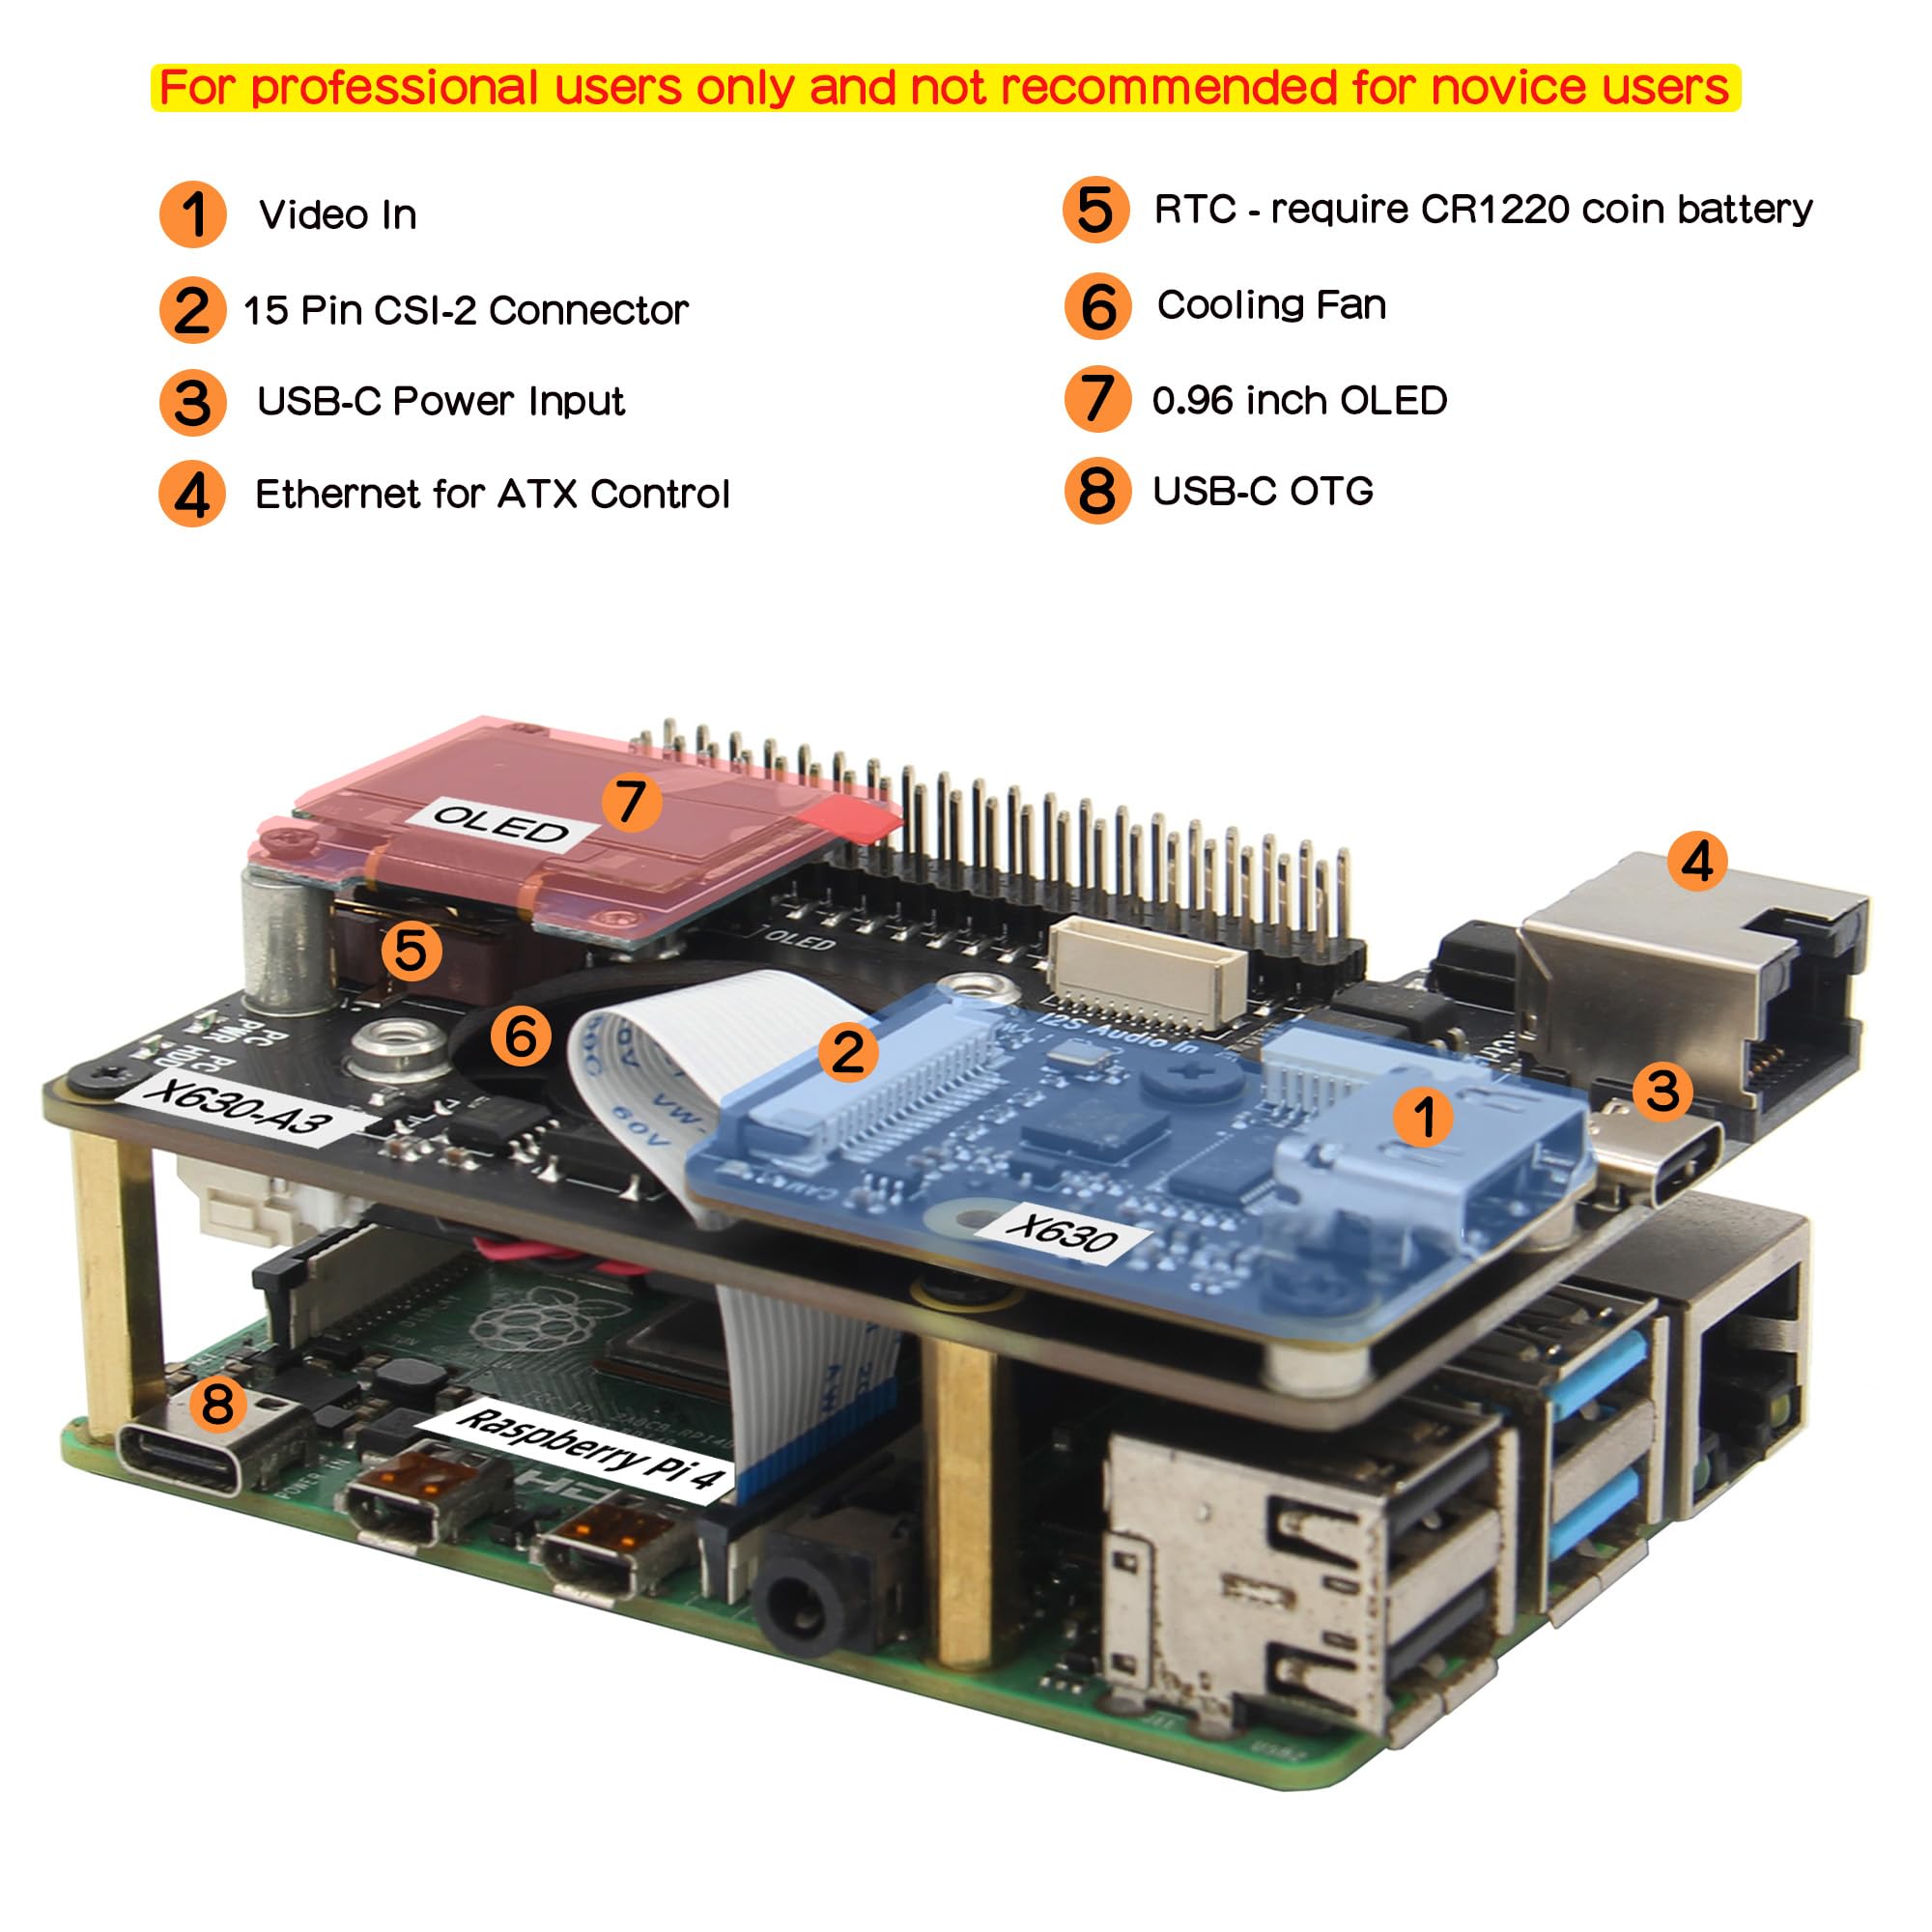
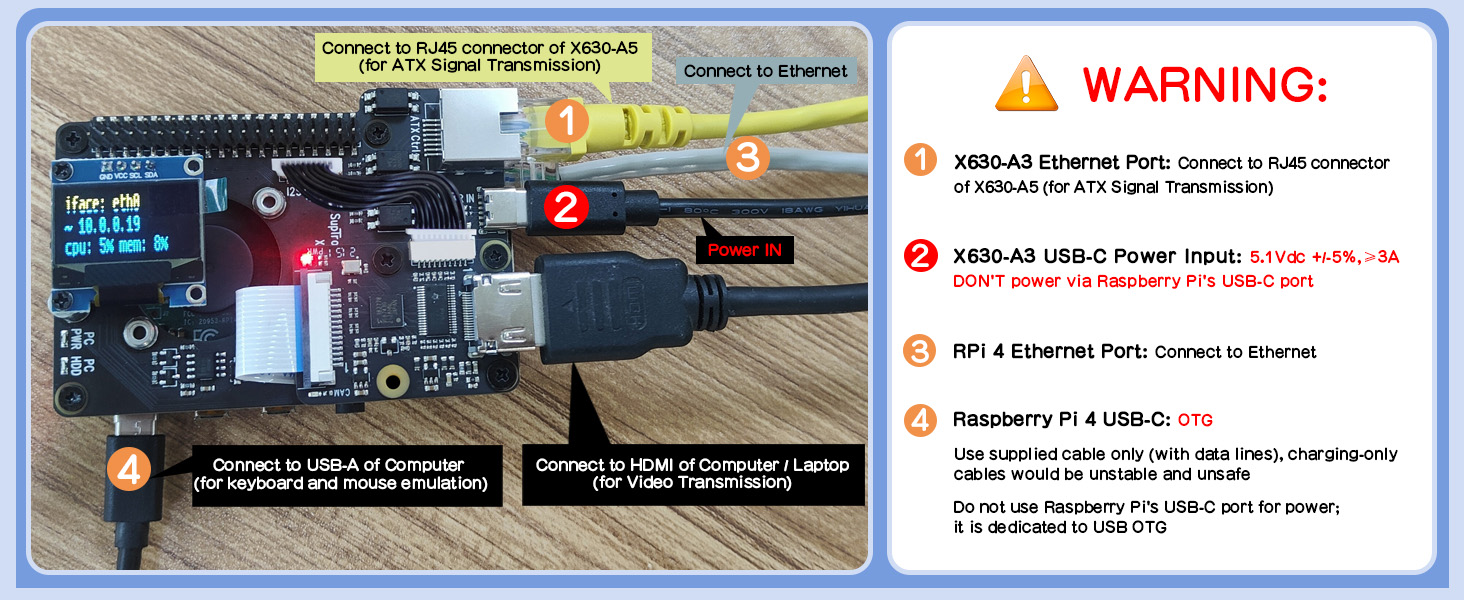
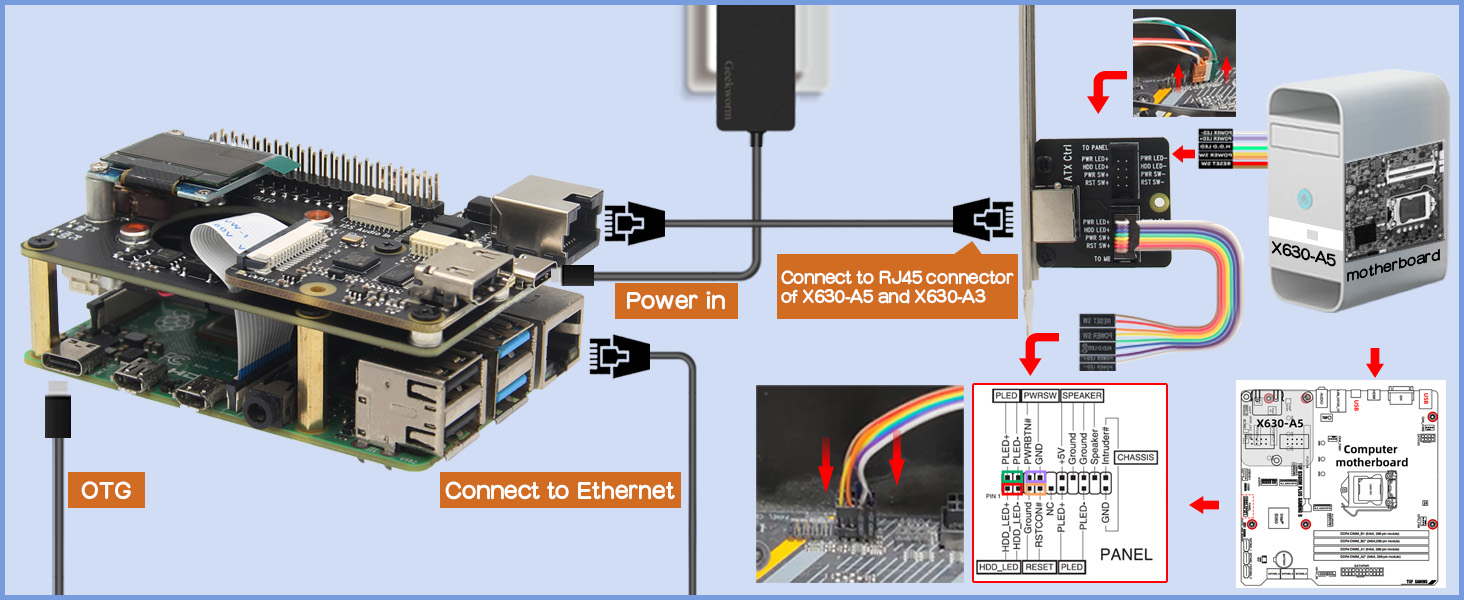
The Geekworm KVM-A3 Kit transforms your Raspberry Pi 4 into a powerful open-source KVM over IP device, enabling full remote control of your computer—including power management, BIOS configuration, and OS reinstallation—via any web browser. Designed exclusively for professional users, this unassembled kit supports all Raspberry Pi 4 models but excludes the Pi, SD card, and power adapter.
| Processor | ARMv7 |
| RAM | LPDDR4 |
| Wireless Type | 802.11b |
| Brand | Geekworm |
| Series | KVM-A3 |
| Item model number | TB-2022-51 |
| Operating System | Not Obtainable |
| Item Weight | 11.3 ounces |
| Product Dimensions | 3.62 x 2.56 x 1.65 inches |
| Item Dimensions LxWxH | 3.62 x 2.56 x 1.65 inches |
| Color | black |
| Processor Brand | Broadcom |
| Number of Processors | 1 |
| Manufacturer | Geekworm |
| ASIN | B0B5R37TT3 |
| Date First Available | July 4, 2022 |
M**H
Great Kit - Works Flawlessly with PiKVM
I bought this as I needed remote KVM/IPMI access in an area that I can only get WiFi, and this kit plus PiKVM was a the perfect solution. This was my first foray into PiKVM so I can't it compare to other kits or PiKVM's own product, but this kit had a very easy setup and did everything I wanted. All you need is an RPI4B, this kit (with power supply), a microSD card, and an HDMI cable.Follow the instructions that come with the kit to assemble, then follow the instructions on the Geekworm website to image it with PiKVM, then go to the PiKVM website to finish configuring.If you expect to do some tweaking/experimentation and think you may need to re-image more than once, I suggest you don't close up the chassis. Although there's a slot to take the SD card out through the case it's too narrow to use, so better to leave the case open until you're 100% set up in case you need to remove the card, rather than removing all the screws every time.Once setup and imaged, all the features worked out of the box, including the OLED. It only takes a handful of commands in PiKVM to get it fully functional for immediate use, though there's plenty of tweaking you can do beyond the basics. If you need WiFi I suggest running wifi-menu (the built-in Arch linux wifi setup tool) instead of the instructions on the PiKVM website.You will likely get a repeating error message about low voltage when you first boot PiKVM with this kit attached. This is normal per the PiKVM website and should go away after a few hours of being powered on and building up a charge. It doesn't impact anything beyond being annoying and filling up your screen before you have full monitor resolution. CR1220 battery is not needed but should get rid of it as well.Great product, will probably buy several more in the future.
G**S
KVM over IP on the cheap!
Ordered the product to manage a proxmox homelab running a workstation board that does not have remote management. Kit was easy to assemble, instruction video showed the process perfectly. Flashed pikvm to a sd card and booted it, worked perfectly first time. LCD showed the ip it had been assigned and i was logged in to remote pc in a few clicks. I wouldn't try to use it for remote gaming, programs like parsec work much better, there is a bit of lag. Using it to manage a remote pc for non gaming tasks, it works perfectly, ability to access bios/UEFI and remotely power and reset makes this a very affordable alternative to other products on the market. It does have a few quirks, the best performance comes from using 720p resolution, though 1080p works quite well too, just don't expect 60 fps. It's locked to 50hz refresh rate, and may need a bit of tweaking for some users. Wiki has much info and the KVM can easily be managed using the terminal or third party software such as putty.
W**E
Should have bought one a long time ago
The package, once completed looks just like the photos. Very high quality build; very hiqh quality implementation. Very simple to "build"; simple to load up; simple to configure. Highly intuitive.In my case, I decided to try using the wireless with this device as I have a pretty good wireless setup. It does not disappoint in the least. I can hook it up to a computer literally anywhere within this house and connect to it; and I cannot tell the difference between wired and wireless, except for the convenience. The little screen works right the moment that it's configured. Took a few minutes to assemble . A few minutes more to load the image ( the V3-hdmi-rpi4-box-latest.img ). The display even gives you the assigned IP address once booted. Yes, you can load ISO images to the device as well. It's everything I want in a remote KVM; to hook up a computer that might otherwise be sitting in the corner.If I had to do it again, I might have bought a few of these instead of buying a kvm for physical boxes.The ONLY downside is that I'm used to multiple monitors; but hey, one can't be too picky. Ecstatic is how I would say I feel about the device.Only con I saw during the build was that a 10mm long screw was missing; out of two boxes; So mounted the hdmi input with just 3 screws; still quite solid.My only regret was not buying a few of these beforehand.
R**S
Great Device - but not for Novice
Great device. Worked out of the box.My only complaint is that the instructions do not provide how to apply the included heat sinks to the RPI 4.Put the unit together (not for a novice). Downloaded the software from the web site. Used Etcher to copy image to SD. Love the screen. Used instructions to utilize WiFi. Unit worked immediately. Great feature is the ATX CNTRL pass through.
S**I
Great product!!!
Works great. I've been able to connect it to my Chromebook, and redirect both mic and speaker to my PC. Very happy!
J**H
Flawless ipmi kit
This kit was well packaged and had everything needed plus some extra hardware. Everything fit together flawlessly. Loaded pikvm-v3 on a microsd, powered on the pi, plugged in the cables and to my surprise, everything worked with zero setup or config. I was able to swap the cables to my different servers and it quickly displayed them in my browser.I didn't test the ATX controls since I will be using this on multiple servers with cheap HDMI and USB switchers. Much cheaper than hooking this to an Ezcoo KVM, but you will need to manually switch the devices. My rack is my office, so this works well for me and saved me some money. 100% recommend this kit.
E**E
Works in theory, easy to break.
Be careful of this design. ATX port is located right next to the similar ethernet port. Plugging ethernet into ATX will kill your PI, there also doesn't seem to be any input voltage protection, even if there is plenty of room for that. Should your power supply fail the whole thing (both PI and adapters) will likely fry.
Trustpilot
1 month ago
1 day ago