

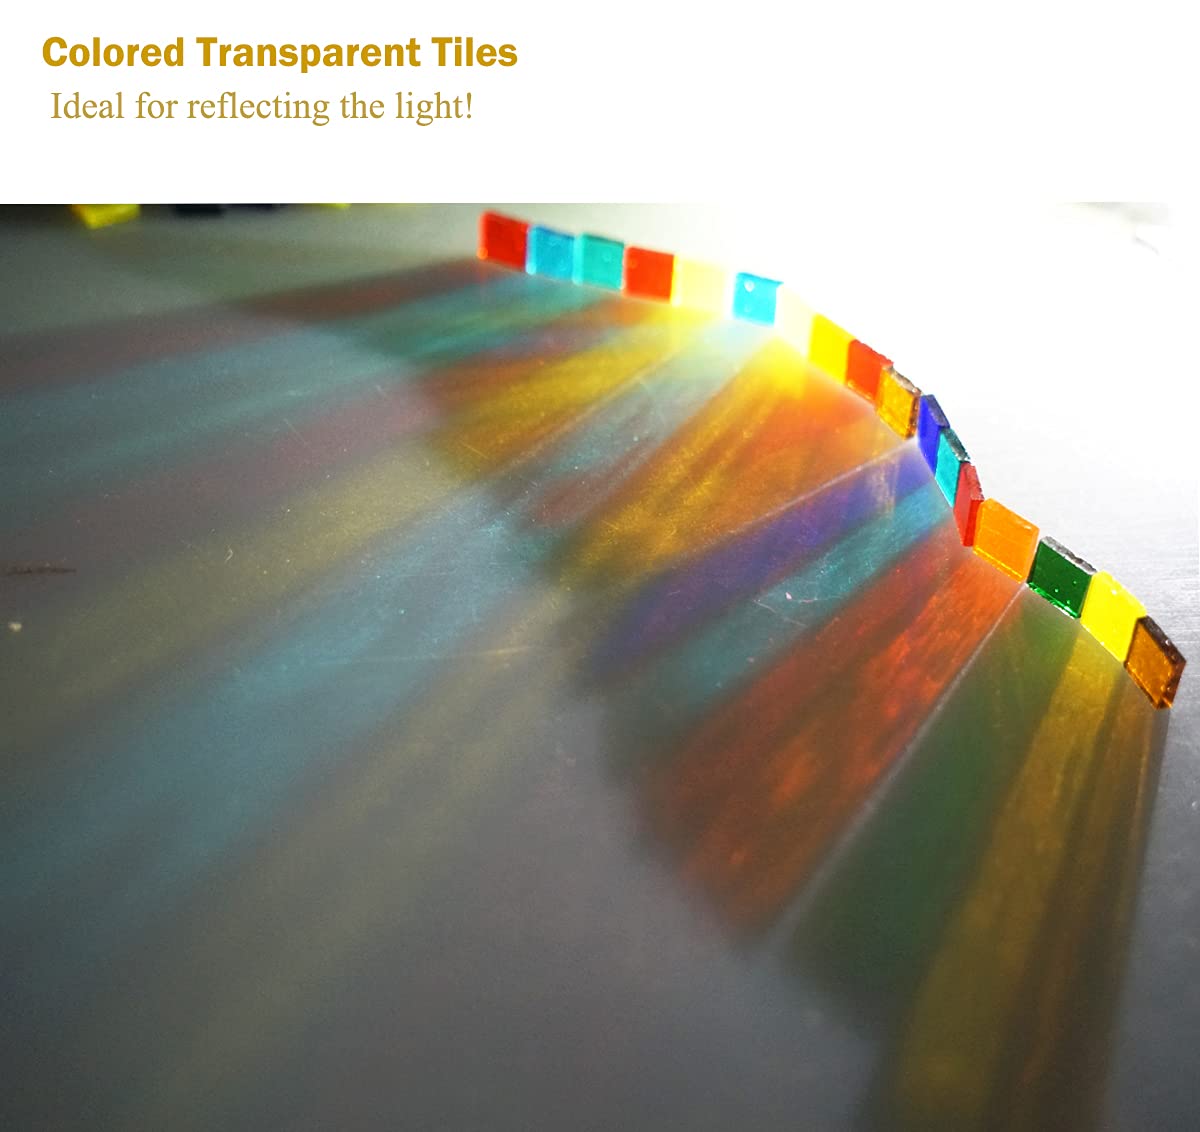


✨ Craft Your Masterpiece with Lanyani Mosaics! 🎉
Lanyani Transparent Square Glass Mosaic Tiles are pre-cut, vibrant pieces designed for effortless crafting. With over 20 colors and textures, this 500g pack contains approximately 600 tiles, each measuring 3/8" on each side and 1/8" thick, ensuring a professional finish for your mosaic projects.
K**H
Exactly what i ordered
Perfect for my mosaic project. Plastic container for the pieces was a surprise bonus and very handy.
A**R
Nice Variety
So many different colors and shapes.
S**R
Fun crafting project for an 11 year old's Mother's Day gift
I should have taken picture of the process, but I'll have to explain what we did to use two bags of these tiles. Here goes.For Mother's Day, I helped my 11 year old son find a decently simple picture to turn into a mosaic and printed it across a couple pieces of paper to span a 15 inch circle.Other items we needed:* 2 x 15 inch circular pieces of concrete backerboard for tile (from any home improvement store)* 1 x 15 inch circular piece of thin plexiglass* 1 x 12 inch plant stand with a flat top* 1 x 100-200 LED solar fairy light string* 2 x tubes of clear silicone caulking for kitchen/bathroom use (I got one with a 10 yr mold guarantee) -- the caulking gun types, not the wimpy little dinky, squeezy tubes!* a caulking gun* 3 x flat brackets to hold the top to the plant stand from underneath once it's all done* some sort of clear-drying craft glue that will bind the glass tiles to the plastic (doesn't have to be water proof and what we used was akin to Elmer's)* enough tile mortar mix that you'll use as grout (I think I used 1-2 pounds of dry powder mix with appropriate amount of water)* a rubber grout float* a large grout sponge* tile or grout sealer/waterproofer* tile/glass nippers if you want to do some finer detail -- note that the finished product likely won't turn out anything like the picture if there's any detail at all to the image, even if you do cut the tiles down. See pictures -- it was all about the thought that counted with our project.* construction adhesive to glue the two circular concrete backerboard pieces together* several UV-protected zip ties to strap the fairy light charger to the table leg.* disposable glovesHere's what we did:1) Pain stakingly sort the colors of the glass into a compartmentalized craft box or a hundred zipper snack bags.2) Print the chosen picture across several pieces of paper (google it), tape it together and center it underneath of the clear plexiglass on a work surface you'll be able to let the kid(s) use for several days. Make a couple marks with a Sharpie to be able to quickly realign it when it moves around.3) Start gluing the tiles to the plexiglass to match the picture underneath leaving space between all the tiles... for hours and hours and hours (or whatever attention span bursts you get from the kids over several days). Try to keep the glue underneath the tiles, not between them. You'll see in the picture where I tested a section with mortar to make sure this was going to work -- ignore that. Note that you will likely have to get creative with color matching and substitution as you exhaust colors, so plan ahead a little based on the amount of any given color you think you'll need for the important parts of the image.4) In the meantime, glue and clamp the backerboard pieces together to make one thicker piece.5) Once the mosaic is finished, glued and dried to the plexiglass, the adult work begins. Get your backerboard, fairy lights, caulking gun and silicone tubes.6) This part's messy, so you'll likely want to use disposable gloves! Shoot all the silicone caulking all over the top of the backerboard.7) Unwind your LED fairy lights and start embedding them into the wet silicone caulking randomly all over the place. Make sure you leave enough cable free on the solar charger end to mount it to the leg of the table you'll be attaching this to.8) While the silicone is still wet, place the plexiglass on top of the lights, tile side up on top of all the lights. The caulking will adhere to the plexiglass as it dries to hold it all together. Make sure your edges of the plexiglass line up with the concrete backerboard underneath. Allow to cure as the silicone instructions say.9) Once cured, carefully flip it upside down and place the plant stand upside down on it. Center the table on the underside of the backerboard and screw the brackets over parts of the table to secure it all together. Secure the LED light charger to a leg of the table so it can be exposed to the sun.10) Turn everything upright, mix your tile mortar and use the grout float to work the mortar between and all over the tiles and around the sides to cover the plexiglass and two layers of backerboard. I added extra tile pieces around the the outside edge using other, much larger glass tile mosaic pieces I had left over from another tiling project. I used mortar and not actual grout because it will dry harder and hopefully hold the tiles together longer than actual grout would outside. This was pure speculation on my part, so please use actual grout if you're more comfortable with it -- just do not use pre-mixed grout! Always use powder because the pre-mixed stuff will turn chalky and fall apart if it gets too wet for too long. Real mortar and grout harden by chemical reactions, not just a drying process of a pre-mixed product.11) Let the mortar set for several minutes. Using a large amount of clean, cool water, continually rinse the sponge and gently wipe the top of the mosaic tile to remove as much of the mortar as possible. There will be a haze left on top, but you'll come back to it later once it's hardened more.12) Allow the mortar to harden and hit it again with the sponge and clean water. You can be more aggressive and get everything as the mortar is now solid enough to withstand more scrubbing as you clean the residual off the tiles13) after the mortar has cured long enough according to the needs of your waterproofing product, follow those directions to waterproof the mortar/grout14) Put your table in the sun to expose the LED charger and enjoy it, especially at night! I'd take it in during the winter as the freeze/thaw cycles will likely dislodge your tiles. Protect it and it should be fine.Again, you can see from the final product that it barely looks like the original image, especially since we had to do some color substitutions due to lack of tiles, but we got creative with it and I think it turned out pretty well for the handiwork of an 11 year old. He was happy with it, too.Hey, Amazon! Fix your picture rotation and honor how they're actually rotated during upload, please! The rest of the Internet has done this, so why can't you? Thank you.
C**P
Mosaic ukele
I was happy with the variety of colors and shapes in the box. Was able to complete my project of tiling my husband's father's ukele. Incorporated his father's military medals as well as both of their golf memorabilia. All done with just one box of the mosaics. Even had a little left over.
D**.
Colorful tiles
Very colorful. But very small. Smaller than I thought they would be, but that's probably my fault for not reading the details. I can still use them, they're really cute, just going to take a lot more tiles and alot more planning.
S**H
Good variety of colors, but very tiny
They arrive same day and the color variety is good. The number and shape of each color is inconsistent but I guess that’s to be expected. They are pretty and there were only 2-3 broken tiles. However, to use them I will have to order another batch as they are very tiny. And there were not 1050. I only got 921. These are also very thin, around 2mm, and not uniform thickness. If i could cut my own, it would be a huge savings as these cost way more than the sheets of glass used to make them.it looked to me like most of the prices i saw on line are similar for this type of tiles, though.
D**A
calidad
considero que son muy poca cantidad por el precio
S**E
Fun craft
The kids loved using these for making stepping stones
C**E
Excelente producto
Me gustó la calidad llegó en tiempo y forma
J**N
Beautiful shades of glass
Love all the different colours and various shades of each. It really helped blend my colours on my table. I loved them so much I just ordered another bag for another project!
K**A
petal mosaic tiles
for what i paid for these , garbage
J**S
Perfect!
Exactly as described! Love it!
M**G
Mosaic Basics
This item was as described. It was part of a larger purchase of various basic mosaic tiles. These will be used to fill in among larger tiles in various mosaic projects.
Trustpilot
5 days ago
1 month ago
